It’s School Time
This tutorial has been written by
©Rie on November 18, 2011
this is from my own creations and ideas if there is
any resemblance to any others it’s just a coincidence.
You may share my blog links with others but you may
not steal and place it on any website without
my permission.
This has been copyrighted so please do not use illegally.

MCN: C31GP-YUSXJ-AMVV8
Before we begin:
You are under no circumstances allowed to post this on a web site, blog. By doing this you are in direct violation of our copyright and if found will be prosecuted. DO NOT TRY IT!
Supplies Needed:
Working knowledge of psp
I used psp3 but should work in any version
Any ScrapKit of your choosing.
I used FTU SK By Peace per her TOU’s You may email here at peacetags65@yahoo.com
Special thanks to Pmarie Scraps for her CU products. http://petitemariedesigns.blogspot.com/
Special Thanks to Dark Creations for her CU Products. damndark@Gmail.com
I also used artwork by Joel Adams.
You may use any font you choose (I used Pieces NFI)
Drop Shadow will remain the same
It’s School Time!

Step One:
Save often so you do not lose it if something happens.
Open up your image and copyright info and minimize.
Download and extract your Scrap Kit to your folder.
Open a new image 500 X 500.
I used paper 2 copy and paste as new layer.
Close paper choice.
Step Two:
Maximize your image of choice.
C/P as new layer and place where you like.
Effects/ 3D Effects/ Drop Shadow
V/H 2 Opacity 50 Blur 5 Color Blk

Find dropper and choose colors for borders.
Now choose your elements.
Step 3:
I used butterfly2, foldedribbon, ribbon0.
Place where you would like on your tag.
Add Drop Shadow on each element.
C/P butterfly2 and resize to 60%. Place in upper right corner of image. (All layers unchecked)
Now c/p foldedribbon. Place on bottom middle. Under your image. (Look at my tag 4 ref).
C/P ribbon0. Place on top under your image.
Step 4:
Image add borders 10

Click Ok
Magic wand select your border.
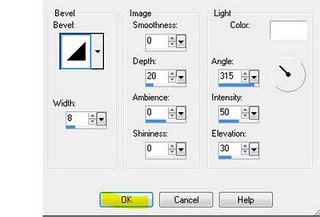
Effects/ 3D Effects/ Inner Bevel.

Selections/ Select None.
Step 5:
Image resize 500 all layers checked.
Place copyright information.
Choose Font and place name on image.
Save and your done I hope you enjoyed the tut

 MCN: C31GP-YUSXJ-AMVV8
Before we begin:
You are under no circumstances allowed to post this on a web site, blog. By doing this you are in direct violation of our copyright and if found will be prosecuted. DO NOT TRY IT!
Supplies Needed:
Working knowledge of psp
I used psp3 but should work in any version
Any ScrapKit of your choosing.
I used FTU SK By Peace per her TOU’s You may email here at peacetags65@yahoo.com
Special thanks to Pmarie Scraps for her CU products. http://petitemariedesigns.blogspot.com/
Special Thanks to Dark Creations for her CU Products. damndark@Gmail.com
I also used artwork by Joel Adams.
You may use any font you choose (I used Pieces NFI)
Drop Shadow will remain the same
It’s School Time!
MCN: C31GP-YUSXJ-AMVV8
Before we begin:
You are under no circumstances allowed to post this on a web site, blog. By doing this you are in direct violation of our copyright and if found will be prosecuted. DO NOT TRY IT!
Supplies Needed:
Working knowledge of psp
I used psp3 but should work in any version
Any ScrapKit of your choosing.
I used FTU SK By Peace per her TOU’s You may email here at peacetags65@yahoo.com
Special thanks to Pmarie Scraps for her CU products. http://petitemariedesigns.blogspot.com/
Special Thanks to Dark Creations for her CU Products. damndark@Gmail.com
I also used artwork by Joel Adams.
You may use any font you choose (I used Pieces NFI)
Drop Shadow will remain the same
It’s School Time!
 Step One:
Save often so you do not lose it if something happens.
Open up your image and copyright info and minimize.
Download and extract your Scrap Kit to your folder.
Open a new image 500 X 500.
I used paper 2 copy and paste as new layer.
Close paper choice.
Step Two:
Maximize your image of choice.
C/P as new layer and place where you like.
Effects/ 3D Effects/ Drop Shadow
V/H 2 Opacity 50 Blur 5 Color Blk
Step One:
Save often so you do not lose it if something happens.
Open up your image and copyright info and minimize.
Download and extract your Scrap Kit to your folder.
Open a new image 500 X 500.
I used paper 2 copy and paste as new layer.
Close paper choice.
Step Two:
Maximize your image of choice.
C/P as new layer and place where you like.
Effects/ 3D Effects/ Drop Shadow
V/H 2 Opacity 50 Blur 5 Color Blk
 Find dropper and choose colors for borders.
Now choose your elements.
Step 3:
I used butterfly2, foldedribbon, ribbon0.
Place where you would like on your tag.
Add Drop Shadow on each element.
C/P butterfly2 and resize to 60%. Place in upper right corner of image. (All layers unchecked)
Now c/p foldedribbon. Place on bottom middle. Under your image. (Look at my tag 4 ref).
C/P ribbon0. Place on top under your image.
Step 4:
Image add borders 10
Find dropper and choose colors for borders.
Now choose your elements.
Step 3:
I used butterfly2, foldedribbon, ribbon0.
Place where you would like on your tag.
Add Drop Shadow on each element.
C/P butterfly2 and resize to 60%. Place in upper right corner of image. (All layers unchecked)
Now c/p foldedribbon. Place on bottom middle. Under your image. (Look at my tag 4 ref).
C/P ribbon0. Place on top under your image.
Step 4:
Image add borders 10
 Click Ok
Magic wand select your border.
Effects/ 3D Effects/ Inner Bevel.
Click Ok
Magic wand select your border.
Effects/ 3D Effects/ Inner Bevel.
 Selections/ Select None.
Step 5:
Image resize 500 all layers checked.
Place copyright information.
Choose Font and place name on image.
Save and your done I hope you enjoyed the tut
Selections/ Select None.
Step 5:
Image resize 500 all layers checked.
Place copyright information.
Choose Font and place name on image.
Save and your done I hope you enjoyed the tut
No comments:
Post a Comment